> ## Documentation Index
> Fetch the complete documentation index at: https://knowledge.bitbybit.studio/llms.txt
> Use this file to discover all available pages before exploring further.
# How to add data sources to the Knowledge Base
> Train your AI Agent using PDF documents, spreadsheets, websites, and images.
**Prerequisites**
* **Access:** Logged in to [AI Studio](https://app.bitbybit.studio/ai-studio).
* **Supported Files:** PDF, CSV, XLSX, DOCX, TXT (Max 10MB).
* **Supported Images:** JPG, PNG (Max 5MB).
For a step-by-step guide, please visit our [**YouTube Channel**](https://www.youtube.com/@bitbybit.studio) or watch the video below:
## Why use diverse data sources?
Your AI Agent needs different types of "brain food" to be effective. While a **PDF** might contain your return policy, a **CSV** might hold your pricing list, and an **Image** acts as a visual menu to send to customers. Combining these sources creates a robust, expert agent.
## Data Source Types
Understand which source fits your content.
| Type | Format | Best For |
| :---------- | :------------------------ | :--------------------------------------------------------- |
| **File** | PDF, DOCX, TXT, CSV, XLSX | Internal SOPs, Product Manuals, Price Lists. |
| **Text** | Raw Text | Paste specific paragraphs or temporary rules directly. |
| **Website** | URL | Dynamic content like blog posts or help centers. |
| **Image** | JPG, PNG | Visual assets the AI *sends* to users (e.g., Menus, Maps). |
## Configuration steps
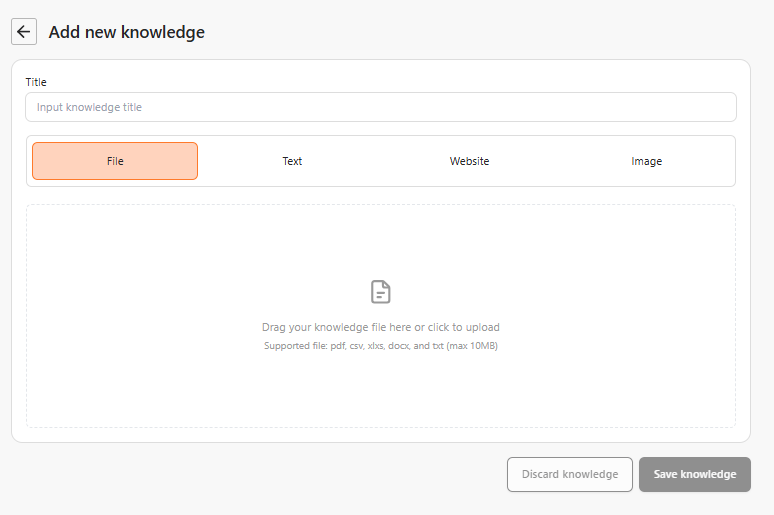
You add data sources from the **Add Knowledge** button. The Knowledge Base list shows the sources already added for reference — it's a view, not an upload area.
1. Open your AI Studio dashboard.
2. Click on **Knowledge Base** in the side menu.
3. Click the **Add Knowledge** button in the top right.
Choose the tab that matches your data type.
**Upload documents directly.**
1. Select the **File** tab.
2. Drag and drop your file (Max 10MB).
3. Give it a clear Title (e.g., "Return Policy 2025").
4. Click **Save knowledge**.
**Connect your live web content.**
1. Select the **Website** tab.
2. Enter the **Website URL**.
3. Choose your crawl method below.
**Method 1: Single Page (Default)**
* **What it does:** Indexes *only* the specific article or page you provide.
* **When to use:** For a specific blog post, product page, or news article.
* **Example:** `https://yourwebsite.com/blog/latest-feature` (Unchecked box).
**Method 2: Crawl Entire Website**
* **What it does:** Looks for the sitemap and systematically indexes *all* connected pages.
* **When to use:** To teach the AI about your entire company, products, and services.
* **Example:** `https://yourwebsite.com` (Checked box).
**⚠️ Deep Dive: Crawling Best Practices**
For "Crawl entire website" to work optimally, you **must provide the main domain**.
* **✅ Do this:** Enter a root domain like `https://bitbybit.studio`. This allows the crawler to easily find the sitemap.
* **❌ Avoid this:** Do not enter a specific sub-page like `https://bitbybit.studio/bitchat` with the crawl box checked. The crawler may fail to locate the sitemap from a deep link.
**Quick Decision Guide:**
| Goal | URL Type | Crawl Option |
| :--------------------------- | :------------------------ | :------------- |
| Teach AI one specific post | `https://myblog.com/post` | **Unchecked** |
| Teach AI entire company info | `https://mycompany.com` | **Checked** 👍 |
**Teach the AI to send images.**
1. Select the **Image** tab.
2. Upload your JPG/PNG.
3. **Critical:** In the "When should the AI send this image?" field, type the trigger prompt (e.g., "Send this when user asks for the dinner menu").
## Next steps
Once your data is uploaded, verify that the agent is reading it correctly.
Ask questions related to your uploaded PDF or Website to test accuracy.
Enable "Product Recommendations" if you uploaded a product catalog CSV.