> ## Documentation Index
> Fetch the complete documentation index at: https://knowledge.bitbybit.studio/llms.txt
> Use this file to discover all available pages before exploring further.
# How to configure AI Tagging
> Automatically categorize conversations using smart labels, sentiment analysis, and custom rules.
**What is AI Tagging?** AI Tagging allows your AI Agent to "listen" to conversations and automatically apply labels based on the context. This helps you filter chats later for analytics or follow-up without manual sorting.
## Default System Tags
By default, the AI Agent comes equipped with three essential tagging capabilities that require no configuration:
1. **Language:** Automatically detects and tags the language the customer is speaking (e.g., `English`, `Spanish`, `Indonesian`).
2. **Priority:** Analyzes the sentiment and urgency to tag conversations as `High`, `Medium`, or `Low`.
3. **Intention:** Summarizes the user's goal (e.g., `Support`, `Sales`, `Inquiry`).
## Creating Custom Tags
You can create specific tags to track product interest, campaign success, or specific customer types.
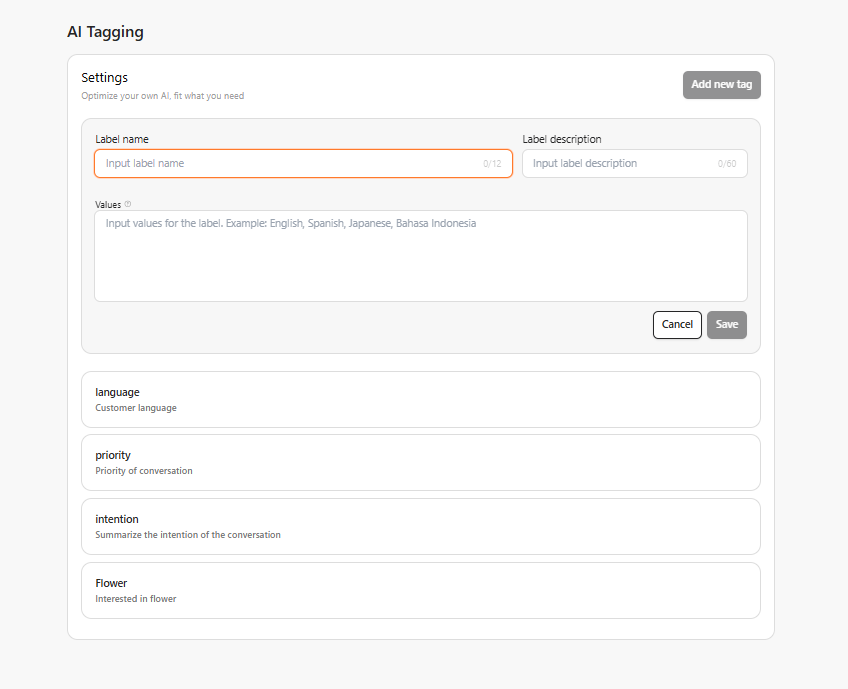 1. Navigate to \*\*AI Studio Sidebar \*\*> **AI Tagging**.
2. Click the **Add new tag** button in the top right corner.
Define how the AI recognizes and labels the specific topic.
Give your tag a unique internal name.
* *Example:* `Smartphone_Interest`
This is the most critical step. You must tell the AI **what to look for**. Think of this as a mini-instruction.
* *Example:* "Identify the specific smartphone model the customer is asking about or interested in buying."
List the specific tag values the AI is allowed to apply. If the customer mentions a model, the AI will pick the matching value from this list.
* *Example:* `iPhone 15, Samsung Galaxy S24, Google Pixel 8, iPhone 14`
Click **Save** to activate the tag. The AI will now scan future conversations for these keywords and contexts.
## Example Use Cases
| Goal | Label Name | Description | Values |
| :----------------- | :---------------- | :----------------------------------------- | :------------------------------------------- |
| **Track Products** | `Laptop_Model` | Identify which laptop the user asks about. | `MacBook Air`, `Dell XPS`, `Lenovo ThinkPad` |
| **Lead Source** | `Referral_Source` | Identify how the user found us. | `Google`, `Facebook`, `Friend`, `Newsletter` |
| **Complaint Type** | `Issue_Category` | Categorize the type of problem reported. | `Shipping`, `Defect`, `Payment`, `Login` |
**Best Practice:** When entering **Values**, separate them with commas. Ensure the "Label Description" is specific enough so the AI knows exactly which value to pick from the list.
1. Navigate to \*\*AI Studio Sidebar \*\*> **AI Tagging**.
2. Click the **Add new tag** button in the top right corner.
Define how the AI recognizes and labels the specific topic.
Give your tag a unique internal name.
* *Example:* `Smartphone_Interest`
This is the most critical step. You must tell the AI **what to look for**. Think of this as a mini-instruction.
* *Example:* "Identify the specific smartphone model the customer is asking about or interested in buying."
List the specific tag values the AI is allowed to apply. If the customer mentions a model, the AI will pick the matching value from this list.
* *Example:* `iPhone 15, Samsung Galaxy S24, Google Pixel 8, iPhone 14`
Click **Save** to activate the tag. The AI will now scan future conversations for these keywords and contexts.
## Example Use Cases
| Goal | Label Name | Description | Values |
| :----------------- | :---------------- | :----------------------------------------- | :------------------------------------------- |
| **Track Products** | `Laptop_Model` | Identify which laptop the user asks about. | `MacBook Air`, `Dell XPS`, `Lenovo ThinkPad` |
| **Lead Source** | `Referral_Source` | Identify how the user found us. | `Google`, `Facebook`, `Friend`, `Newsletter` |
| **Complaint Type** | `Issue_Category` | Categorize the type of problem reported. | `Shipping`, `Defect`, `Payment`, `Login` |
**Best Practice:** When entering **Values**, separate them with commas. Ensure the "Label Description" is specific enough so the AI knows exactly which value to pick from the list.