> ## Documentation Index
> Fetch the complete documentation index at: https://knowledge.bitbybit.studio/llms.txt
> Use this file to discover all available pages before exploring further.
# How to add a profile picture to your WhatsApp Cloud API via Facebook
> Add a brand profile picture to your WhatsApp Cloud API through the phone number settings in Facebook Business Manager
Now that you have figured out [How to Create and Connect WhatsApp Cloud API](/bitchat/how-to-create-and-connect-whatsapp-cloud-api-with-bitbybit) with bitbybit, it’s time to personalize your profile by adding a picture that represents your brand or company. Your profile picture is crucial as it creates the first impression for your (potential) customers when they interact with you. Many businesses opt for their logo to convey professionalism and trust, while others showcase their signature product to familiarize customers with their offerings.Regardless of your choice, follow these steps to add a profile picture to your WhatsApp Cloud API:
1. Go to: [https://business.facebook.com/wa/manage/phone-numbers/](https://business.facebook.com/wa/manage/phone-numbers/)
2. **Select the Phone Number Settings:** On the list of phone numbers that you wish to update, click the ‘Settings’ icon ⚙️
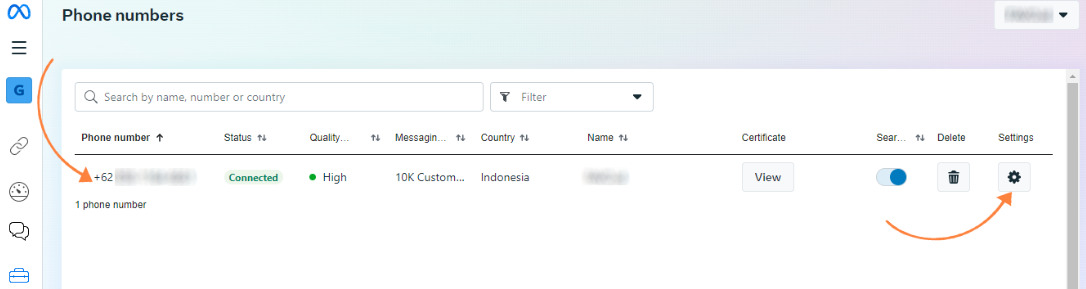 \
Click the 'Settings' icon
3. Navigate to Profile Settings: Once on the Settings page, go to the ‘Profile’ tab on the left, and then click the ‘Choose file’ button.
\
Click the 'Settings' icon
3. Navigate to Profile Settings: Once on the Settings page, go to the ‘Profile’ tab on the left, and then click the ‘Choose file’ button.
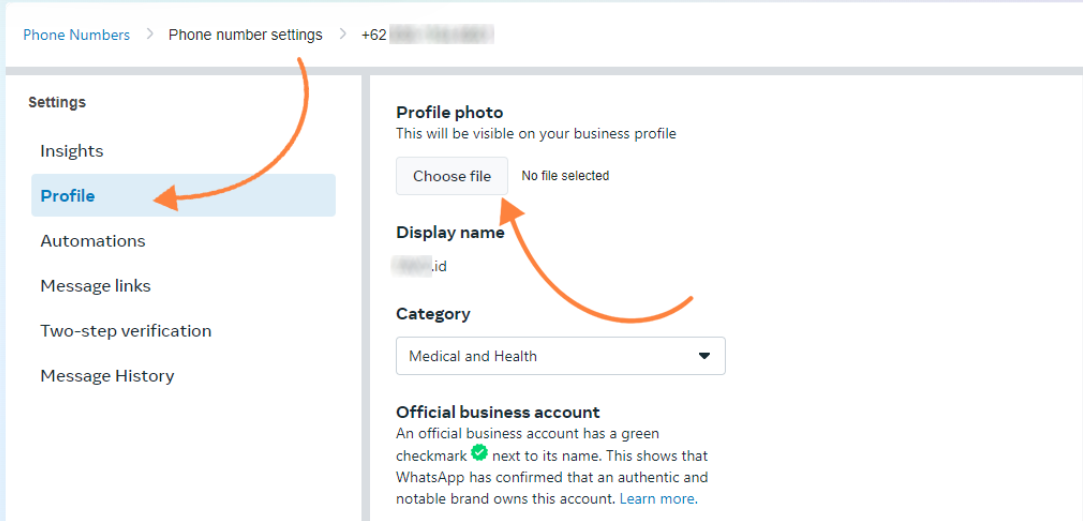 On the Profile tab, click "Choose file" button
4. **Upload Your Image:** Choose the image file for your WhatsApp profile picture and wait for it to be uploaded. The best profile picture should be at least 192px by 192px and be either a JPG or PNG format.
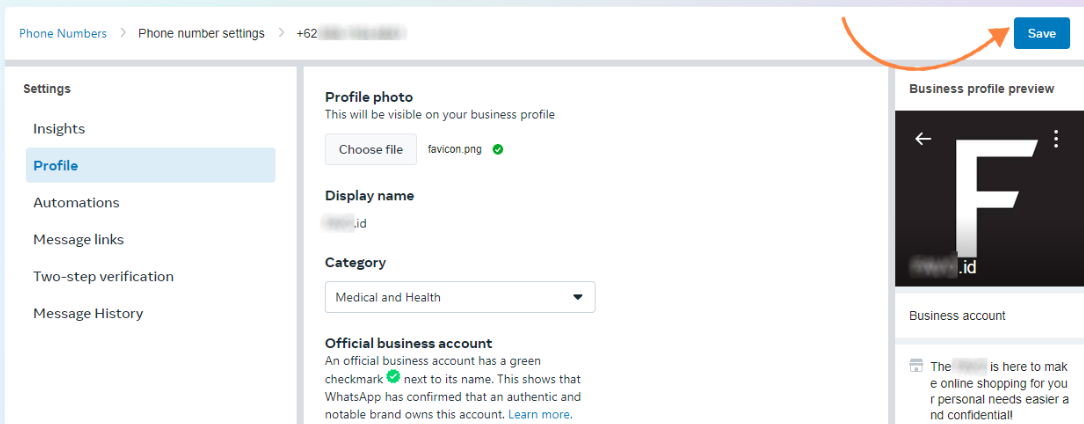
5. **Preview and Save:** Once uploaded, preview the image on the right side of the page. Make sure it is correct, and then click ‘Save’.
On the Profile tab, click "Choose file" button
4. **Upload Your Image:** Choose the image file for your WhatsApp profile picture and wait for it to be uploaded. The best profile picture should be at least 192px by 192px and be either a JPG or PNG format.
5. **Preview and Save:** Once uploaded, preview the image on the right side of the page. Make sure it is correct, and then click ‘Save’.
 6. **Profile Picture Live:** Your WhatsApp Cloud API’s profile picture is now live!
With these simple steps, you can showcase a professional and cohesive brand image on WhatsApp, making a lasting impression on your customers and building trust.
6. **Profile Picture Live:** Your WhatsApp Cloud API’s profile picture is now live!
With these simple steps, you can showcase a professional and cohesive brand image on WhatsApp, making a lasting impression on your customers and building trust.