> ## Documentation Index
> Fetch the complete documentation index at: https://knowledge.bitbybit.studio/llms.txt
> Use this file to discover all available pages before exploring further.
# Data Management & Voucher Messaging via bitbybit
> Upload voucher codes via CSV, use the overwrite option, and match dynamic variables to deliver accurate voucher messages in bitbybit
> This procedure ensures the accuracy of voucher code delivery to customers, minimizes data errors during the upload process, and standardizes the message template creation on the bitbybit platform.
## 1. Prepare Your Upload File (CSV)
The first step is to ensure your spreadsheet structure allows the system to read unique variables automatically.
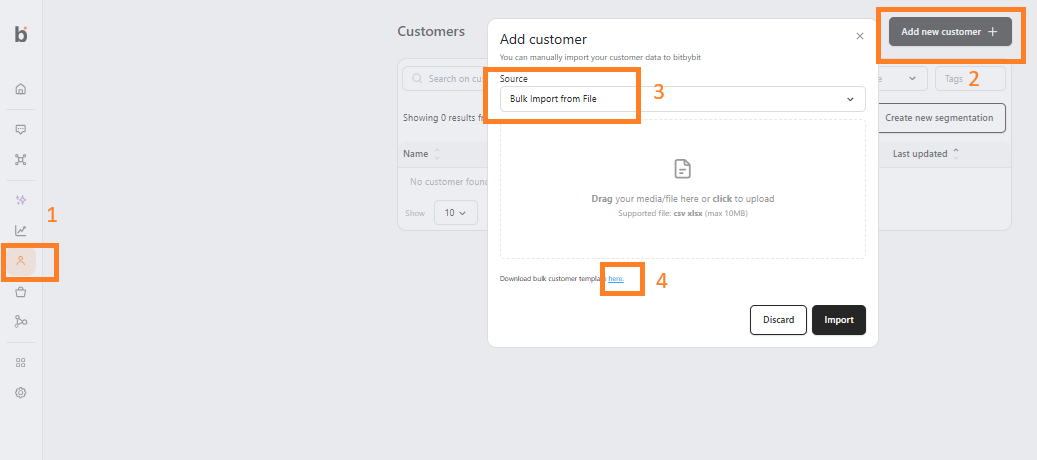
* **Access the Template**: Go to the **Customers** page in your bitbybit dashboard.
* **Initiate Import**: Click on **Add New Customer** and select the **Bulk Import from File** option.
* **Download Template**: Click **Download Template** to obtain the official CSV structure provided by bitbybit.
 * **Data Placement**: Move all voucher code data to the empty column on the far right of your spreadsheet.
* **Header Naming**: Name the first row (header) of that column using the standard format: **"CODE + \[Category/Tag]"**.
* *Example*: If your campaign is "MAY PROMO", the header should be: **"CODE MAY PROMO"**.
* **Data Placement**: Move all voucher code data to the empty column on the far right of your spreadsheet.
* **Header Naming**: Name the first row (header) of that column using the standard format: **"CODE + \[Category/Tag]"**.
* *Example*: If your campaign is "MAY PROMO", the header should be: **"CODE MAY PROMO"**.
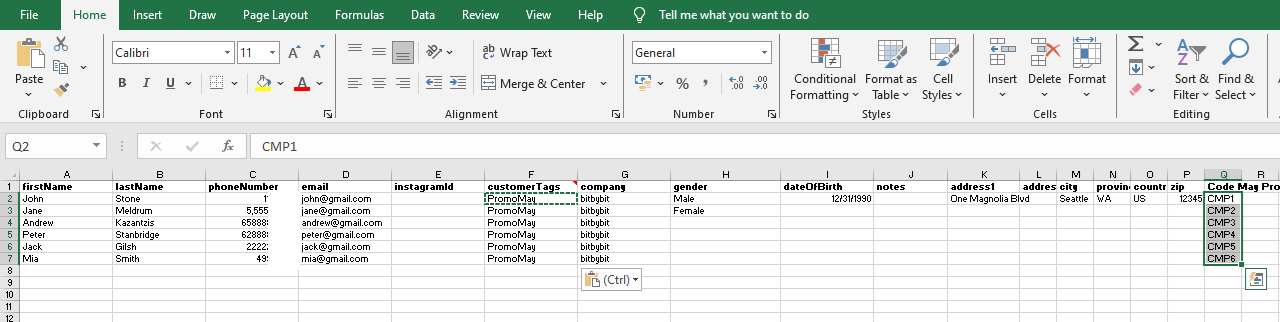 * **File Format**: Once organized, save or download the file in **CSV (Comma Separated Values)** format.
## 2. Upload to bitbybit & The Overwrite Feature
This process updates customer profiles with the specific data prepared in your file.
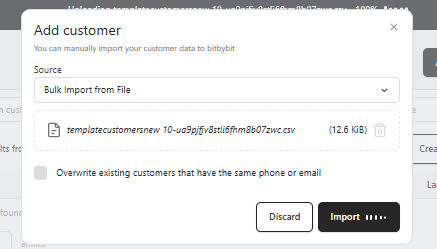
* **Import Data**: Go to the upload menu on the bitbybit platform and select your prepared CSV file.
* **Overwrite Setting**: You will see an option to **"Overwrite existing customers that have the same phone or email."**
* **File Format**: Once organized, save or download the file in **CSV (Comma Separated Values)** format.
## 2. Upload to bitbybit & The Overwrite Feature
This process updates customer profiles with the specific data prepared in your file.
* **Import Data**: Go to the upload menu on the bitbybit platform and select your prepared CSV file.
* **Overwrite Setting**: You will see an option to **"Overwrite existing customers that have the same phone or email."**
 ### **When to Check "Overwrite":**
* **Voucher Distribution**: Always check this when adding new voucher codes to customers who are already in your database.
* **Updating Information**: Check this if you are correcting existing names, addresses, or updating **Additional Data** fields.
* **Avoiding Duplicates**: This ensures the system updates the current profile rather than creating a second, identical entry for the same customer.
### **When NOT to Check "Overwrite":**
* **Purely New Leads**: Leave this unchecked if you are uploading a list of completely new customers and do not want to risk changing any existing data.
* **Data Safety**: If you want the system to skip or reject any row where the phone or email is already registered to prevent accidental data changes.
## 3. Verify Upload Results
Always perform a quality check before sending bulk messages.
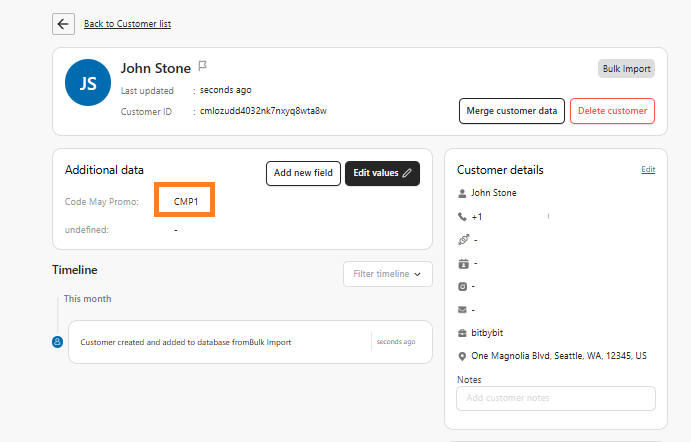
* **Sample Check**: Go to the **Customers** page and randomly open one customer profile.
* **Validation**: Check the **Additional Data** section in the profile.
* **Confirmation**: Ensure the voucher code is uploaded and correctly matches the header created in Step 1.
### **When to Check "Overwrite":**
* **Voucher Distribution**: Always check this when adding new voucher codes to customers who are already in your database.
* **Updating Information**: Check this if you are correcting existing names, addresses, or updating **Additional Data** fields.
* **Avoiding Duplicates**: This ensures the system updates the current profile rather than creating a second, identical entry for the same customer.
### **When NOT to Check "Overwrite":**
* **Purely New Leads**: Leave this unchecked if you are uploading a list of completely new customers and do not want to risk changing any existing data.
* **Data Safety**: If you want the system to skip or reject any row where the phone or email is already registered to prevent accidental data changes.
## 3. Verify Upload Results
Always perform a quality check before sending bulk messages.
* **Sample Check**: Go to the **Customers** page and randomly open one customer profile.
* **Validation**: Check the **Additional Data** section in the profile.
* **Confirmation**: Ensure the voucher code is uploaded and correctly matches the header created in Step 1.
 ## 4. Segmentation & Message Template
Define who will receive the message and what it will look like.
* **Customer Segmentation**: Create a segment of recipients by following our detailed guide here: [How to Create a Customer Segment](https://knowledge.bitbybit.studio/bitcrm/how-to-create-a-customer-segment).
* **Message Template**: Create your message campaign template by following this guide: [How to Create a Message Template Campaign for WhatsApp API](https://knowledge.bitbybit.studio/bitcrm/how-to-create-a-message-template-campaign-for-whatsapp-api).
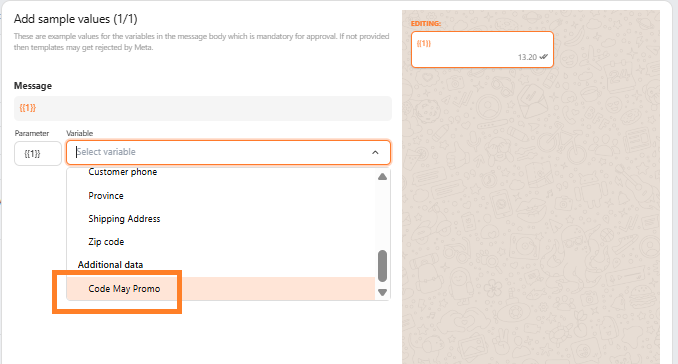
* **Variable Synchronization**: When creating your message template, use the variable that **exactly matches** the header in your CSV file.
* *Example*: If your header is "CODE MAY PROMO", select the variable option with that identical name in the template settings.
## 4. Segmentation & Message Template
Define who will receive the message and what it will look like.
* **Customer Segmentation**: Create a segment of recipients by following our detailed guide here: [How to Create a Customer Segment](https://knowledge.bitbybit.studio/bitcrm/how-to-create-a-customer-segment).
* **Message Template**: Create your message campaign template by following this guide: [How to Create a Message Template Campaign for WhatsApp API](https://knowledge.bitbybit.studio/bitcrm/how-to-create-a-message-template-campaign-for-whatsapp-api).
* **Variable Synchronization**: When creating your message template, use the variable that **exactly matches** the header in your CSV file.
* *Example*: If your header is "CODE MAY PROMO", select the variable option with that identical name in the template settings.
 ## 5. Campaign Testing (Internal Trial)
Verify that the variables are calling the correct data through a test run.
* **Internal Test**: Do not send messages directly to real clients before testing.
* **Testing Procedure**: Send a test message to your team’s internal numbers first to ensure the layout and codes appear correctly.
* **Execution**: If the test result is successful, proceed with the broadcast to the actual client segment.
## 6. Advanced Procedures (Updates & Multiple Codes)
* **Updating Existing Codes**: Add new code data to the corresponding customer row and re-upload with the **overwrite** option checked.
* **Structure Preservation**: **Do not change the header name** in the first row (Row 1), as the system relies on it to identify the data field.
* **Adding Multiple Codes**: If a customer requires two different codes, create a new column with a **New Header** (e.g., "CODE BIRTHDAY"), fill in the data, and call both variables within your single message template.
## 5. Campaign Testing (Internal Trial)
Verify that the variables are calling the correct data through a test run.
* **Internal Test**: Do not send messages directly to real clients before testing.
* **Testing Procedure**: Send a test message to your team’s internal numbers first to ensure the layout and codes appear correctly.
* **Execution**: If the test result is successful, proceed with the broadcast to the actual client segment.
## 6. Advanced Procedures (Updates & Multiple Codes)
* **Updating Existing Codes**: Add new code data to the corresponding customer row and re-upload with the **overwrite** option checked.
* **Structure Preservation**: **Do not change the header name** in the first row (Row 1), as the system relies on it to identify the data field.
* **Adding Multiple Codes**: If a customer requires two different codes, create a new column with a **New Header** (e.g., "CODE BIRTHDAY"), fill in the data, and call both variables within your single message template.