> ## Documentation Index
> Fetch the complete documentation index at: https://knowledge.bitbybit.studio/llms.txt
> Use this file to discover all available pages before exploring further.
# How to Create a New WhatsApp Cloud API Campaign with bitbybit
> Create and schedule a WhatsApp Cloud API campaign in bitCRM by selecting a customer segment and message template for targeted broadcasts
For a step-by-step guide on how to complete this pros, please visit [our YouTube Channel.](https://www.youtube.com/@bitbybit.studio/videos)
Set up and launch a WhatsApp Cloud API campaign in bitCRM to boost customer engagement with targeted messaging.
WhatsApp Cloud API campaigns in bitCRM enable businesses to directly engage customers with targeted messages. Whether you want to send updates, promotions, or reminders, this feature lets you craft and schedule campaigns for maximum impact. Learn how to set up your campaign quickly and effectively.
To create a personalized marketing campaign, please set your customer segmentations first, by following these guides below:
• [How to Create a Customer Segment](https://knowledge.bitbybit.studio/bitcrm/how-to-create-a-customer-segment#how-to-create-a-customer-segment).
• [How To Create Customer Segmentation And Track Message After A Broadcast](https://knowledge.bitbybit.studio/bitcrm/how-to-create-customer-segmentation-and-track-message-after-a-broadcast#how-to-create-customer-segmentation-and-track-message-after-a-broadcast).
Once you have segmented the customers, follow these steps to create a personalized Whatsapp campaign.
## **Step 1: Go to Campaign Dashboard.**
* Navigate to your [bitCRM Campaign](https://app.bitbybit.studio/bitcrm/campaign) dashboard and click "Create new campaign."
* Go to Campaign dashboard and click "Create new campaign"
## **Step 2: Select a Channel.**
* Click "WhatsApp Cloud API"
* Click "WhatsApp Cloud API"
## **Step 3: Setup Your Campaign.**
* Enter "Campaign name" and Choose your "Segmentation" from the dropdown. Read [How to Create a Customer Segment](https://knowledge.bitbybit.studio/bitcrm/how-to-create-a-customer-segment#how-to-create-a-customer-segment) for the details.
* Enter "Campaign name" and Choose "Campaign targets"
## **Step 4: Schedule & Choose Message Template.**
* Click "Send immediately" or “Schedule send” by selecting the date and time. Then choose your campaign template. Read [How to Create a Message Template Campaign for WhatsApp API](https://knowledge.bitbybit.studio/bitcrm/how-to-create-a-customer-segment#how-to-create-a-customer-segment) for details. Click “Review”.
* Click "Schedule" and choose "template"
 * Go to Campaign dashboard and click "Create new campaign"
## **Step 2: Select a Channel.**
* Click "WhatsApp Cloud API"
* Go to Campaign dashboard and click "Create new campaign"
## **Step 2: Select a Channel.**
* Click "WhatsApp Cloud API"
 * Click "WhatsApp Cloud API"
## **Step 3: Setup Your Campaign.**
* Enter "Campaign name" and Choose your "Segmentation" from the dropdown. Read [How to Create a Customer Segment](https://knowledge.bitbybit.studio/bitcrm/how-to-create-a-customer-segment#how-to-create-a-customer-segment) for the details.
* Click "WhatsApp Cloud API"
## **Step 3: Setup Your Campaign.**
* Enter "Campaign name" and Choose your "Segmentation" from the dropdown. Read [How to Create a Customer Segment](https://knowledge.bitbybit.studio/bitcrm/how-to-create-a-customer-segment#how-to-create-a-customer-segment) for the details.
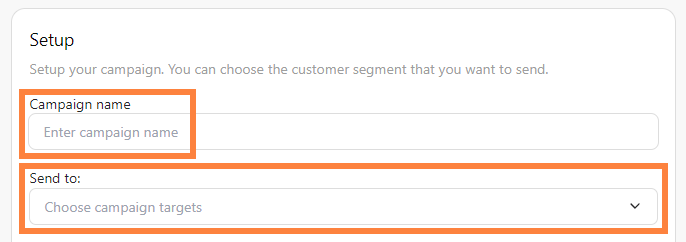 * Enter "Campaign name" and Choose "Campaign targets"
## **Step 4: Schedule & Choose Message Template.**
* Click "Send immediately" or “Schedule send” by selecting the date and time. Then choose your campaign template. Read [How to Create a Message Template Campaign for WhatsApp API](https://knowledge.bitbybit.studio/bitcrm/how-to-create-a-customer-segment#how-to-create-a-customer-segment) for details. Click “Review”.
* Enter "Campaign name" and Choose "Campaign targets"
## **Step 4: Schedule & Choose Message Template.**
* Click "Send immediately" or “Schedule send” by selecting the date and time. Then choose your campaign template. Read [How to Create a Message Template Campaign for WhatsApp API](https://knowledge.bitbybit.studio/bitcrm/how-to-create-a-customer-segment#how-to-create-a-customer-segment) for details. Click “Review”.
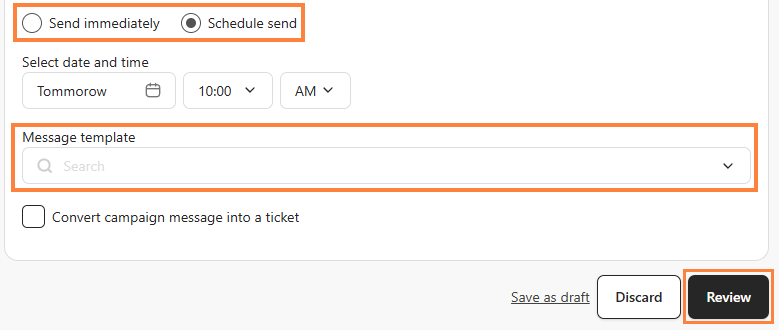 * Click "Schedule" and choose "template"