> ## Documentation Index
> Fetch the complete documentation index at: https://knowledge.bitbybit.studio/llms.txt
> Use this file to discover all available pages before exploring further.
# How to Create and Connect WhatsApp API Cloud
> Create and connect WhatsApp Cloud API to bitbybit, from Meta Business verification and phone setup to adding a payment method
For a step-by-step guide on how to complete this process, please visit [our YouTube Channel.](https://www.youtube.com/@bitbybit.studio/videos)
If you are ready to start working with the "WhatsApp Cloud API" and boost your business potential, here is a guide on how to integrate a number into your WhatsApp account. Please remember to check the Requirements section so you can follow the process smoothly.
## Requirements Before You Start the Process
* **Verified Meta Business Manager (Business Verification)** Your business must be verified by Meta with legal documents.
* **Admin Access to Meta Business Manager** You must have full control access in your Business Manager account.
* **A Phone Number (Clean & Unused)**
- Not currently used on any WhatsApp (personal or business).
- **Can receive SMS or phone calls for verification.**
**- If your number is active on WhatsApp, you must delete the WhatsApp account first.** To do so, please follow [steps 3-5 of this process](https://developers.facebook.com/docs/whatsapp/on-premises/get-started/migrate-existing-whatsapp-number-to-a-business-account).
* **Highly Recommended** Use a **new phone number** that has never been used on WhatsApp to ensure a smooth process.
**Business Details Ready:**
* Business name, address, website or social media page, email.
* Legal documents (NPWP, SIUP, or equivalent).
## **Create Meta Business Manager (if you don’t have one)**
* Go to [business.facebook.com](http://business.facebook.com) and create a new Business Account.
* Complete your business information and verify your email address.
⚠️ **Make sure your Facebook account has Full Control (Admin Access)** in Business Settings → People. This is required to continue the integration process.
### **Verify Your Business Manager**
* In Business Settings, go to Security Center → Business Verification.
* Submit your legal business documents (e.g. NPWP, SIUP, or other equivalent documents as required).
⚠️ **Business verification is mandatory** to unlock full WhatsApp API access and use it for real customer messaging.
## Integration Process
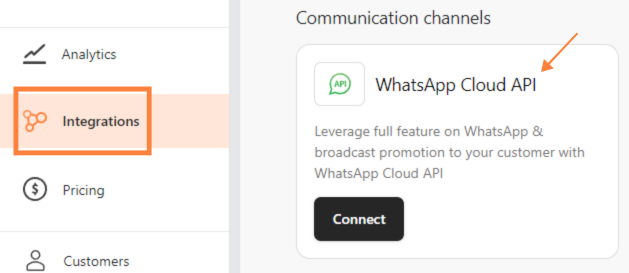
**Step 1: Access Integrations**
1. **Navigate** to the "[Integrations](https://app.bitbybit.studio/integrations)" dashboard. Select “WhatsApp Cloud API”.
* Step 2:
* Connect your Facebook account
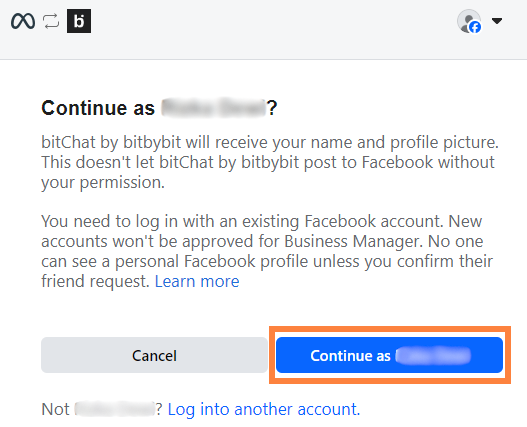
* 1
* Click
* "Continue as your Facebook Account"
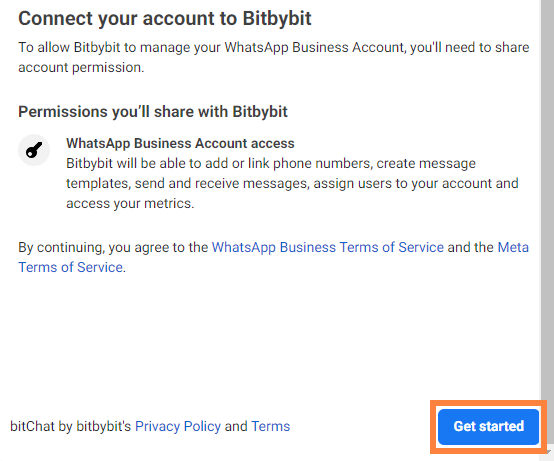
* 2
* Click
* "Get started"
\##Create New Business Information
⚠️ This step will only be necessary if you are creating a new Facebook Business Manager Account.
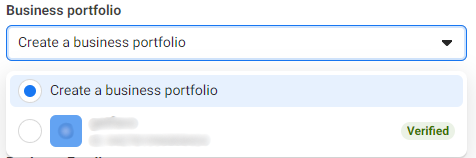
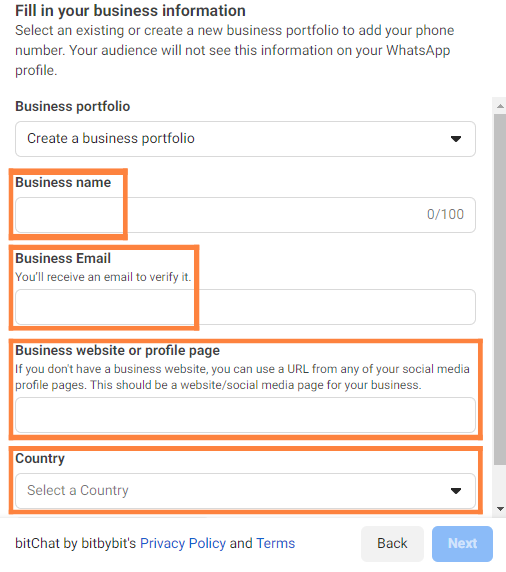
1. On the "**Fill in your business information**", click the "Business portfolio" dropdown and choose between:
* Create a business portfolio
* and fill in details like "Business name," "Business email," "Business website or profile page," and "Country"
* Or select an existing
* business portfolio
* from the dropdown, which will auto-fill the form
* Click **"Next"**.
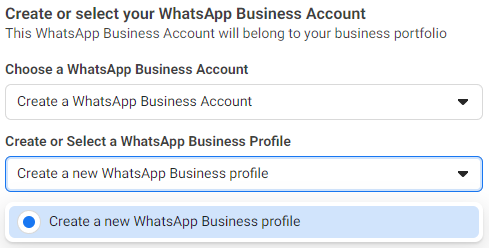
4. On the "**Create or select your WhatsApp Business Account**", click the "Create a WhatsApp Business Account" and “Create or Choose WhatsApp Business Profile” dropdown and choose between:
* Choose "Create a WhatsApp Business Account" and in the next dropdown, "Create a new WhatsApp Business Profile."
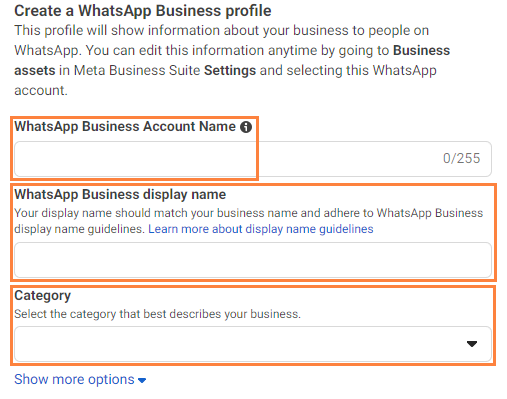
* Fill in "WhatsApp Business Account Name," "WhatsApp Business display name," and "Category". Then click “Next”.
⚠️ **We recommend using the same "Display Name" as the branding on your website.** [Check the Display name guidelines.](https://www.facebook.com/business/help/757569725593362)
Or Select Existing Facebook Business Manager
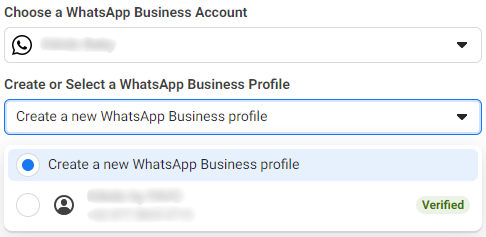
* Or select an existing “WhatsApp Business account” and, in the "Create or choose WhatsApp Business Profile" dropdown, choose to "Create a new WhatsApp Business profile."
* ⚠️
* Importance!
* You can create multiple profiles on your WhatsApp Business account
## Add A Phone Number for WhatsApp
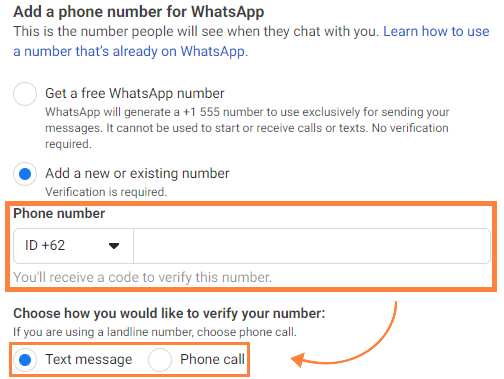
Add the phone number that you will be connecting with [bitbybit Studio](https://app.bitbybit.studio/integrations). Please remember that this number can't be used simultaneously in WhatsApp business or the WhatsApp consumer app.
Or, get a free WhatsApp number: WhatsApp will generate a +1 555 number to use exclusively for sending messages. It cannot be used to start or receive calls or texts. No verification is required. [This option will be available for selected accounts.](https://developers.facebook.com/docs/whatsapp/embedded-signup/#555-business-phone-numbers)
Once done, click "Next".
If the existing phone number is active on one of the WhatsApp apps, you'll need to delete it from the app. To do so, please [follow steps 3-5 of this process.](https://developers.facebook.com/docs/whatsapp/on-premises/get-started/migrate-existing-whatsapp-number-to-a-business-account)
5. Enter a **phone number** to receive the **verification code** in "Add a new or existing number."
## Insert verification code
⚠️Make sure your phone number is able to receive SMS or phone calls for verification
* Note: We highly recommend enabling
* two-factor authentication
* for enhanced security
## **Add Payment Method**
1.Complete the process by clicking **"Add payment method"**
* Please pay attention
* : To unlock additional features and other advanced functionalities,
* you need to add a payment method
*
* If you **skip** adding a payment method, your WhatsApp Cloud API will **still be connected**, but some features **will be restricted** like message templates and campaigns.
To fully activate your WhatsApp Cloud API and unlock all messaging features, you need to add a payment method in Meta Business Manager. Please follow the steps below carefully:
1. Go to Business Settings at [business.facebook.com](https://business.facebook.com).
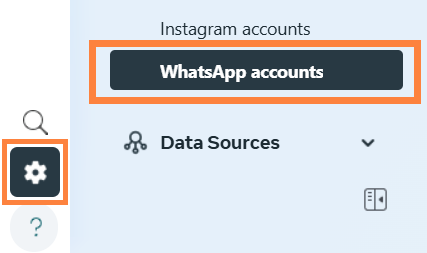
2. In the left sidebar, select Settings and click WhatsApp Accounts.
3. Select the WhatsApp Business Account you’ve just connected.
4. Scroll down and click Payment Settings.
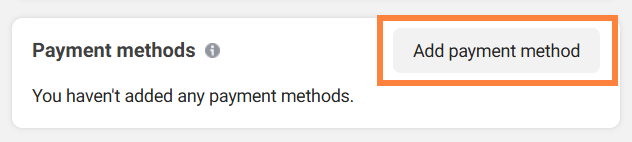
5. Click Add Payment Method and complete the required billing details.
6. Fill in all Business Information as requested (name, legal entity, billing address, etc).
7. After saving, make sure there are no alerts or warnings on the payment settings page.
### **Test Your WhatsApp API**
After setting up WhatsApp Cloud API including adding the payment method, send a test message, test it by sending a message using a **Campaign, Automation, or Chat Initiation** template. Follow these guides to create your template:
* **Campaign**: [Create Template Campaign](https://knowledge.bitbybit.studio/bitcrm/how-to-create-a-message-template-campaign-for-whatsapp-api)
* **Automation**: [Create Template Automation](https://knowledge.bitbybit.studio/bitcrm/how-to-create-an-automation#how-to-create-an-automation)
* **Chat Initiation**: [Create Template Chat Initiation](https://knowledge.bitbybit.studio/bitchat/how-to-create-a-chat-initiation-template#how-to-create-a-chat-initiation-template)
Note that Meta categorizes messages into conversation rate:Authentication, Marketing, Utility, Service. Check Meta’s pricing details [here](https://business.whatsapp.com/products/platform-pricing).
Once your template is created, test it in [bitbybit’s LiveChat](https://app.bitbybit.studio/bitchat/livechat) page to ensure it sends and receives successfully.
**⚠️** If the message successfully delivers, your integration is 100% complete.\
**⚠️** If it fails, recheck the steps above, especially your payment status and phone number verification.
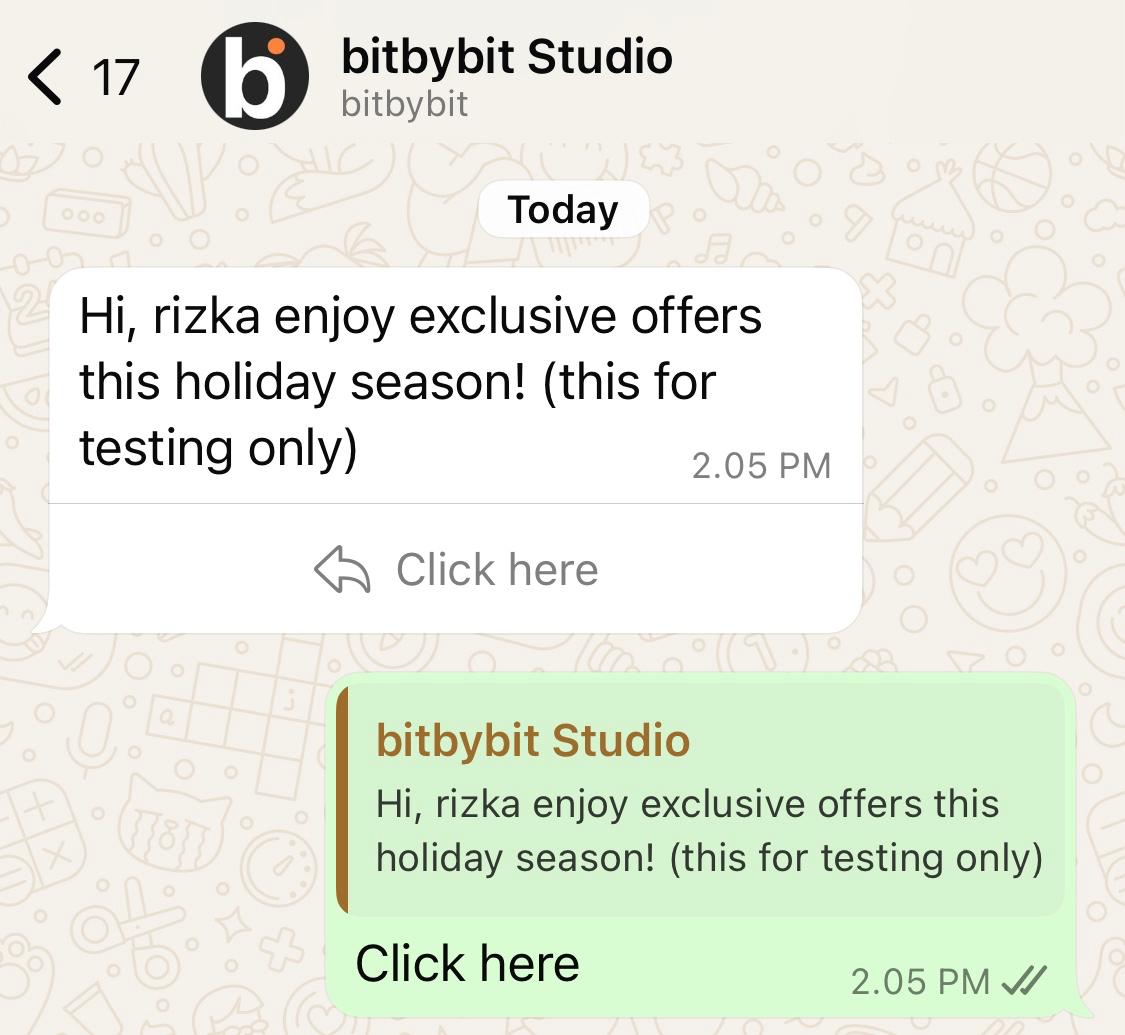
**The message** you sent should appear on the **bitbybit** Livechat page.
**Congratulations! You have successfully created and connected your WhatsApp Cloud API with bitbybit**. This powerful integration will help you manage your customer communications more efficiently, providing a seamless and professional experience for your clients.
Happy messaging!
 * Step 2:
* Connect your Facebook account
* Step 2:
* Connect your Facebook account
 * 1
* Click
* "Continue as your Facebook Account"
* 1
* Click
* "Continue as your Facebook Account"
 * 2
* Click
* "Get started"
* 2
* Click
* "Get started"
 \##Create New Business Information
⚠️ This step will only be necessary if you are creating a new Facebook Business Manager Account.
1. On the "**Fill in your business information**", click the "Business portfolio" dropdown and choose between:
\##Create New Business Information
⚠️ This step will only be necessary if you are creating a new Facebook Business Manager Account.
1. On the "**Fill in your business information**", click the "Business portfolio" dropdown and choose between:
 * Create a business portfolio
* and fill in details like "Business name," "Business email," "Business website or profile page," and "Country"
* Create a business portfolio
* and fill in details like "Business name," "Business email," "Business website or profile page," and "Country"
 * Or select an existing
* business portfolio
* from the dropdown, which will auto-fill the form
* Click **"Next"**.
4. On the "**Create or select your WhatsApp Business Account**", click the "Create a WhatsApp Business Account" and “Create or Choose WhatsApp Business Profile” dropdown and choose between:
* Choose "Create a WhatsApp Business Account" and in the next dropdown, "Create a new WhatsApp Business Profile."
* Or select an existing
* business portfolio
* from the dropdown, which will auto-fill the form
* Click **"Next"**.
4. On the "**Create or select your WhatsApp Business Account**", click the "Create a WhatsApp Business Account" and “Create or Choose WhatsApp Business Profile” dropdown and choose between:
* Choose "Create a WhatsApp Business Account" and in the next dropdown, "Create a new WhatsApp Business Profile."
 * Fill in "WhatsApp Business Account Name," "WhatsApp Business display name," and "Category". Then click “Next”.
⚠️ **We recommend using the same "Display Name" as the branding on your website.** [Check the Display name guidelines.](https://www.facebook.com/business/help/757569725593362)
* Fill in "WhatsApp Business Account Name," "WhatsApp Business display name," and "Category". Then click “Next”.
⚠️ **We recommend using the same "Display Name" as the branding on your website.** [Check the Display name guidelines.](https://www.facebook.com/business/help/757569725593362)
 Or Select Existing Facebook Business Manager
* Or select an existing “WhatsApp Business account” and, in the "Create or choose WhatsApp Business Profile" dropdown, choose to "Create a new WhatsApp Business profile."
Or Select Existing Facebook Business Manager
* Or select an existing “WhatsApp Business account” and, in the "Create or choose WhatsApp Business Profile" dropdown, choose to "Create a new WhatsApp Business profile."
 * ⚠️
* Importance!
* You can create multiple profiles on your WhatsApp Business account
## Add A Phone Number for WhatsApp
Add the phone number that you will be connecting with [bitbybit Studio](https://app.bitbybit.studio/integrations). Please remember that this number can't be used simultaneously in WhatsApp business or the WhatsApp consumer app.
Or, get a free WhatsApp number: WhatsApp will generate a +1 555 number to use exclusively for sending messages. It cannot be used to start or receive calls or texts. No verification is required. [This option will be available for selected accounts.](https://developers.facebook.com/docs/whatsapp/embedded-signup/#555-business-phone-numbers)
Once done, click "Next".
If the existing phone number is active on one of the WhatsApp apps, you'll need to delete it from the app. To do so, please [follow steps 3-5 of this process.](https://developers.facebook.com/docs/whatsapp/on-premises/get-started/migrate-existing-whatsapp-number-to-a-business-account)
5. Enter a **phone number** to receive the **verification code** in "Add a new or existing number."
* ⚠️
* Importance!
* You can create multiple profiles on your WhatsApp Business account
## Add A Phone Number for WhatsApp
Add the phone number that you will be connecting with [bitbybit Studio](https://app.bitbybit.studio/integrations). Please remember that this number can't be used simultaneously in WhatsApp business or the WhatsApp consumer app.
Or, get a free WhatsApp number: WhatsApp will generate a +1 555 number to use exclusively for sending messages. It cannot be used to start or receive calls or texts. No verification is required. [This option will be available for selected accounts.](https://developers.facebook.com/docs/whatsapp/embedded-signup/#555-business-phone-numbers)
Once done, click "Next".
If the existing phone number is active on one of the WhatsApp apps, you'll need to delete it from the app. To do so, please [follow steps 3-5 of this process.](https://developers.facebook.com/docs/whatsapp/on-premises/get-started/migrate-existing-whatsapp-number-to-a-business-account)
5. Enter a **phone number** to receive the **verification code** in "Add a new or existing number."
 ## Insert verification code
⚠️Make sure your phone number is able to receive SMS or phone calls for verification
## Insert verification code
⚠️Make sure your phone number is able to receive SMS or phone calls for verification
 * Note: We highly recommend enabling
* two-factor authentication
* for enhanced security
## **Add Payment Method**
1.Complete the process by clicking **"Add payment method"**
* Note: We highly recommend enabling
* two-factor authentication
* for enhanced security
## **Add Payment Method**
1.Complete the process by clicking **"Add payment method"**
 * Please pay attention
* : To unlock additional features and other advanced functionalities,
* you need to add a payment method
*
* If you **skip** adding a payment method, your WhatsApp Cloud API will **still be connected**, but some features **will be restricted** like message templates and campaigns.
To fully activate your WhatsApp Cloud API and unlock all messaging features, you need to add a payment method in Meta Business Manager. Please follow the steps below carefully:
1. Go to Business Settings at [business.facebook.com](https://business.facebook.com).
2. In the left sidebar, select Settings and click WhatsApp Accounts.
* Please pay attention
* : To unlock additional features and other advanced functionalities,
* you need to add a payment method
*
* If you **skip** adding a payment method, your WhatsApp Cloud API will **still be connected**, but some features **will be restricted** like message templates and campaigns.
To fully activate your WhatsApp Cloud API and unlock all messaging features, you need to add a payment method in Meta Business Manager. Please follow the steps below carefully:
1. Go to Business Settings at [business.facebook.com](https://business.facebook.com).
2. In the left sidebar, select Settings and click WhatsApp Accounts.
 3. Select the WhatsApp Business Account you’ve just connected.
4. Scroll down and click Payment Settings.
3. Select the WhatsApp Business Account you’ve just connected.
4. Scroll down and click Payment Settings.
 5. Click Add Payment Method and complete the required billing details.
 6. Fill in all Business Information as requested (name, legal entity, billing address, etc).
7. After saving, make sure there are no alerts or warnings on the payment settings page.
### **Test Your WhatsApp API**
After setting up WhatsApp Cloud API including adding the payment method, send a test message, test it by sending a message using a **Campaign, Automation, or Chat Initiation** template. Follow these guides to create your template:
* **Campaign**: [Create Template Campaign](https://knowledge.bitbybit.studio/bitcrm/how-to-create-a-message-template-campaign-for-whatsapp-api)
* **Automation**: [Create Template Automation](https://knowledge.bitbybit.studio/bitcrm/how-to-create-an-automation#how-to-create-an-automation)
* **Chat Initiation**: [Create Template Chat Initiation](https://knowledge.bitbybit.studio/bitchat/how-to-create-a-chat-initiation-template#how-to-create-a-chat-initiation-template)
Note that Meta categorizes messages into conversation rate:Authentication, Marketing, Utility, Service. Check Meta’s pricing details [here](https://business.whatsapp.com/products/platform-pricing).
Once your template is created, test it in [bitbybit’s LiveChat](https://app.bitbybit.studio/bitchat/livechat) page to ensure it sends and receives successfully.
**⚠️** If the message successfully delivers, your integration is 100% complete.\
**⚠️** If it fails, recheck the steps above, especially your payment status and phone number verification.
**The message** you sent should appear on the **bitbybit** Livechat page.
6. Fill in all Business Information as requested (name, legal entity, billing address, etc).
7. After saving, make sure there are no alerts or warnings on the payment settings page.
### **Test Your WhatsApp API**
After setting up WhatsApp Cloud API including adding the payment method, send a test message, test it by sending a message using a **Campaign, Automation, or Chat Initiation** template. Follow these guides to create your template:
* **Campaign**: [Create Template Campaign](https://knowledge.bitbybit.studio/bitcrm/how-to-create-a-message-template-campaign-for-whatsapp-api)
* **Automation**: [Create Template Automation](https://knowledge.bitbybit.studio/bitcrm/how-to-create-an-automation#how-to-create-an-automation)
* **Chat Initiation**: [Create Template Chat Initiation](https://knowledge.bitbybit.studio/bitchat/how-to-create-a-chat-initiation-template#how-to-create-a-chat-initiation-template)
Note that Meta categorizes messages into conversation rate:Authentication, Marketing, Utility, Service. Check Meta’s pricing details [here](https://business.whatsapp.com/products/platform-pricing).
Once your template is created, test it in [bitbybit’s LiveChat](https://app.bitbybit.studio/bitchat/livechat) page to ensure it sends and receives successfully.
**⚠️** If the message successfully delivers, your integration is 100% complete.\
**⚠️** If it fails, recheck the steps above, especially your payment status and phone number verification.
**The message** you sent should appear on the **bitbybit** Livechat page.
 **Congratulations! You have successfully created and connected your WhatsApp Cloud API with bitbybit**. This powerful integration will help you manage your customer communications more efficiently, providing a seamless and professional experience for your clients.
Happy messaging!
**Congratulations! You have successfully created and connected your WhatsApp Cloud API with bitbybit**. This powerful integration will help you manage your customer communications more efficiently, providing a seamless and professional experience for your clients.
Happy messaging!