

Overview
Metafields are the custom fields Shopify lets you add to a customer record for anything beyond Shopify’s built-in fields. If your team maintains them in the Shopify admin, bitbybit can read them and show them on the customer profile. Once synced, Shopify metafields behave like bitbybit’s own additional data in most of the product — you can segment on them, anchor a scheduled automation to them, and drop them into message copy. The one difference is ownership: Shopify metafields are read-only in bitbybit. Shopify stays the source of truth, and all edits happen in the Shopify admin. The Additional data card on a customer profile therefore has two sources:Before you start
- Connect Shopify to bitCRM. See How to integrate bitCRM with Shopify. The Shopify source only appears when a Shopify integration is connected.
- Add the customer metafields you want in your Shopify admin, and make sure the customers you care about have values saved.
View Shopify metafields on a customer
- Go to Customers and open a customer profile.
- Find the Additional data card.
- Use the source selector in the top-right of the card to switch from bitbybit to Shopify.
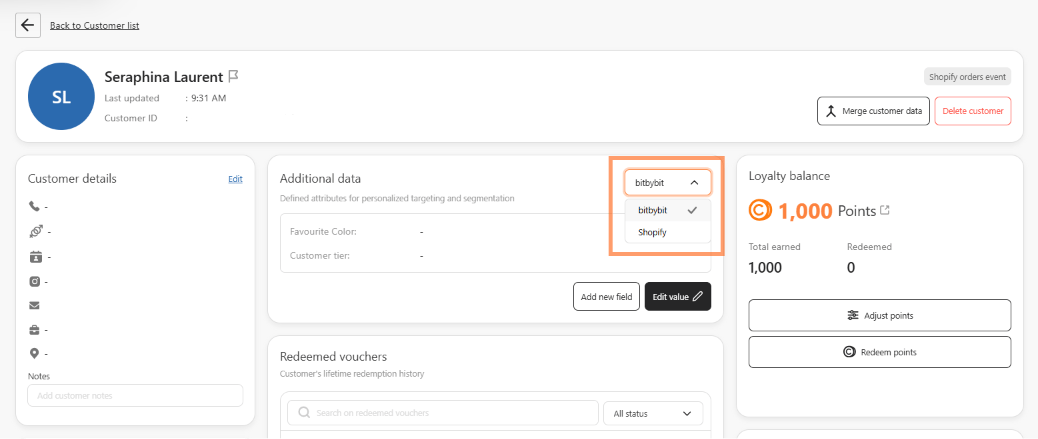
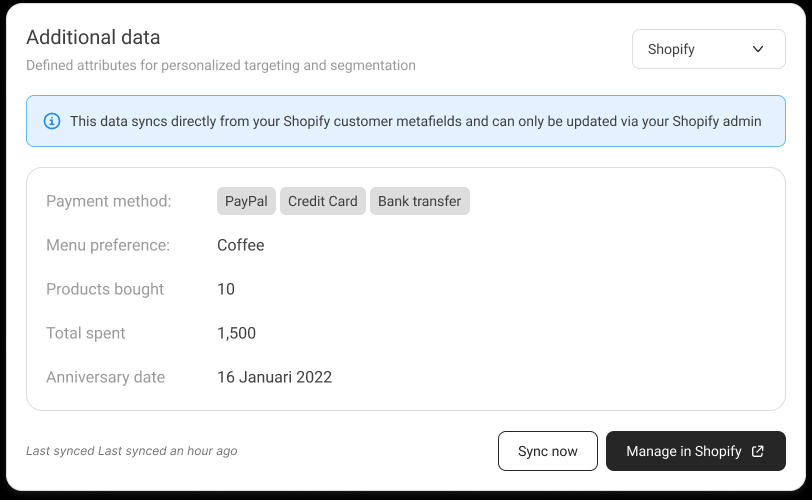
- The card now lists that customer’s Shopify metafields with a banner reading “This data syncs directly from your Shopify customer metafields and can only be updated via your Shopify admin.”
The source selector only appears when Shopify is connected. If the integration is removed, the card automatically switches back to bitbybit.
Sync the latest values
bitbybit reads Shopify metafields on a sync rather than instantly on every change in Shopify. If you’ve just updated a value in Shopify and don’t see it yet, pull it manually.- On the Shopify source, check the indicator next to the buttons — it reads Last synced followed by how long ago the last sync ran, or Not synced yet if the customer has never been synced.
- Click Sync now. The button shows a spinner and the indicator changes to Syncing….
- On success, a “Customer data synced from Shopify” message appears and the indicator reads Last synced just now.
Edit the data in Shopify
Because Shopify owns these fields, the Add new field and Edit value buttons are replaced by Sync now and Manage in Shopify on this source. Click Manage in Shopify to open that customer’s record in your Shopify admin in a new tab. Make your edits there, come back, and click Sync now to pull them in.If bitbybit doesn’t have a Shopify customer ID for this person — for example, they were added in bitbybit rather than created from a Shopify order — Manage in Shopify opens your Shopify customers list instead of that specific customer.
How values are displayed
Shopify metafield values are formatted by type when they reach bitbybit:- Text — shown as-is.
- Date — formatted as
D MMMM YYYY, for example4 March 1990. - Number — formatted with thousands separators.
- Multiple choice — shown as separate tags.
- Money and rating — shown as text, for example
150500 IDRand4.5. - List — shown as a comma-separated line, for example
Electronics, Books.
- A value in grey italics with a “This field type isn’t supported yet” tooltip is a Shopify field type bitbybit can’t format yet. The raw value is still shown.
- A value reading Hidden in grey italics is a protected field Shopify is withholding. Hover it for the explanation.
Where you can use Shopify metafields
Once synced, Shopify metafields flow into the same places as bitbybit’s own additional data — you don’t configure anything per feature:- Customer segments — filter on a Shopify metafield in Customer segmentation. Shopify fields appear alongside bitbybit ones in the field list.
- Scheduled automations — a Shopify metafield with the Date type can anchor a Yearly on custom date schedule. See Set up schedule Triggers in Automation.
- Message personalization — insert a value with the
{{customer.metafields.<key>}}variable in campaign and automation messages, under the Additional data variable group. - AI agent — expose the field to your AI agent’s additional-data skillset so it can use the value when answering customers.